Basic help on using HeidiSQL
This document aims to give users some basic help to get started with HeidiSQL. Over the years, the feature list has grown longer and longer. So, especially new users sometimes don't know where to look at for particular things. In such cases, you can watch out here for a first help. If you don't find what you're looking for, please register in the forum and post a question.
Requirements
HeidiSQL runs fine on Windows 11 (and on Windows 7 + 8 + 10 with some minor issues). Running HeidiSQL on Wine is currently quite unstable.
The normal way to install HeidiSQL is to download a release installer from the downloads page. After installing, you may download nightly builds, either from the download page directly, or through HeidiSQL itself (About > Check for updates).
Connecting to a server
Basics
HeidiSQL is a so called client application, only usable when you have some server available. So, make sure you have some MariaDB, MySQL, MS SQL, PostgreSQL server or SQLite database file to connect to.

A simple setup is to have a MariaDB server installed on localhost (equivalent to the special IP address 127.0.0.1). In HeidiSQL's session manager, you click on the "New" button to create a new connection, and most default settings are already set for you, except from the password, which is mostly not an empty one on a newly installed MariaDB server.
- Prompt for credentials
- Username and password will be prompted each time you connect to this session
- Use Windows authentication
- Username and password will be rooted from your current Windows session to the server connection. Only available on MySQL, MariaDB and MS SQL.
- Cipher
- SQLite only: select one of the supported encryption algorithms throught the drop-down arrow on the right, for instance "rc4" (an alias for "System.Data.SQLite"). You need to provide the key for the main database in the "Key" field then.
- Compressed client/server protocol
- Compress traffic between HeidiSQL and the server. Recommended only on low network bandwidth, or when result sets are large. Only available on MySQL and MariaDB
- Database(s)
- If empty, HeidiSQL shows all databases to which you have access. You can limit the database tree with this setting, by entering only the database names you want to show.
- Encryption parameters
- SQLite only: Configure cipher encryption parameters, in the form "param1=1;param2=200;...". See the supported ciphers page for supported parameter-value pairs.
- Comment
- Any text or note you like. The list of sessions on the left side can show this comment in a column.
You can organize your stored sessions in folders. To create a folder, click the dropdown arrow on the "New" button, then click "Folder in root folder" or "Folder in selected folder". Once you have a folder, you can create connections in it, or drag existing connections into that folder.
Setting up a SSH tunnel connection to MariaDB/MySQL/PostgreSQL
If your MariaDB/MySQL/PostgreSQL server is located on a remote machine which is only accessible via SSH, then you still can use HeidiSQL to connect to it. The HeidiSQL installer places plink.exe in the right folder, so you just need to select it from the pulldown menu. In more recent versions, you can use "ssh.exe" as an alternative, the OpenSSH implementation from Microsoft. In both cases, you need to tell HeidiSQL the SSH credentials plus the MariaDB/MySQL/PostgreSQL/MSSQL credentials.
Note that the default host name for the SSH server is the one you entered in the "Settings" tab. HeidiSQL then advices plink.exe to connect to that host name, or, when you entered a SSH host name, that one is taken. Additionally, the host name on the "Settings" tab is always taken for the -L (listen) option in plink.exe.
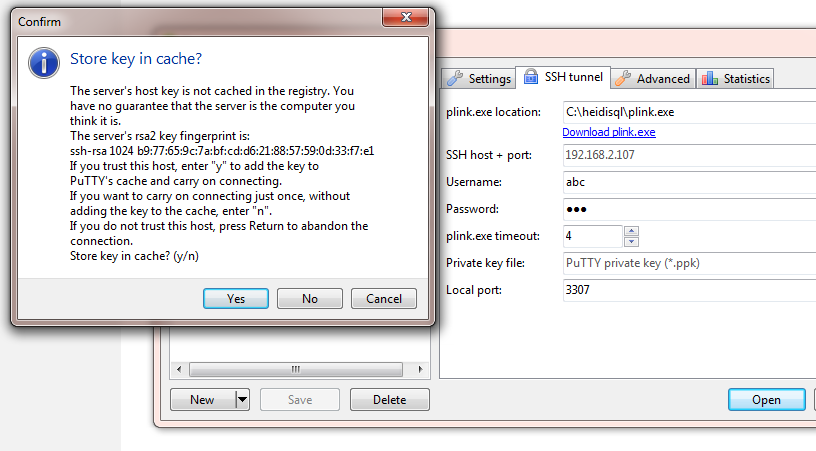
Example settings:
- "Settings" tab:
- Hostname: "127.0.0.1"
- Password: [your mysql password]
- Port: "3306" in most cases
- "SSH tunnel tab:
- SSH Host: [your server name]
- Port: "22" in most cases
- Username: [your ssh user]
- Password: [your ssh password]
- Local port: "3307"
The following error, or a similar one, is mostly caused by a tunnel onto the official IP address of your remote server:
Lost connection to MySQL server at 'reading initial communication packet', system error: 0 "Internal error/check (Not system error)"In such cases, ensure you're using "127.0.0.1" in Settings > Hostname/IP, and the remote IP of your server in SSH tunnel > Host.
Command line switches
Although HeidiSQL is a pure GUI application, it can be automated for connecting and opening files via command line parameters. Parameter names are case sensitive and are based on those used by the MariaDB/MySQL command line applications, e.g. mysqldump.
Common pitfalls:
- Be sure to call HeidiSQL with its full file name ("heidisql.exe"), not with the short version ("heidisql"). HeidiSQL's command line parser expects that this way. This should be fixed in the future.
- Parameter keys can be separated with = or one space from their value, e.g. -h=localhost
- Parameters containing a dot must be wrapped in double quotes. This is important when passing an IP address: -h=192.168.1.1 will use only the first segment 192, while -h="192.168.1.1" is the correct form.
| Short switch | Long switch | Description | Default value |
|---|---|---|---|
| -d | --description | Session name | |
| -n | --nettype |
Network protocol type:
|
0 |
| -h | --host | Host name | |
| -l | --library |
Library or provider (added in v11.1):
|
Depends on the given network protocol, see underlined values |
| -u | --user | User name | |
| -p | --password | Password | |
| -P | --port | Port |
|
| -S | --socket | Socket name, for connecting via named pipe | |
| -db | --databases | Databases, separated by semicolon. Single database on PostgreSQL. Interbase and Firebird expect a local file here. | |
| -W | --winauth | Use Windows authentication: 1 or 0. (MSSQL, MySQL and MariaDB only). | 0 |
| -cte | --cleartextenabled | Enable cleartext authentication: 1 or 0. (MySQL and MariaDB only) | 0 |
| --ssl | Use SSL. (1=yes, 0=no) | 0 | |
| -sslpk | --sslprivatekey | SSL private key | |
| -sslca | --sslcacertificate | SSL CA certificate | |
| -sslcert | --sslcertificate | SSL certificate | |
| -sslcip | --sslcipher | SSL cipher | |
| -sslvrf | --sslverification | SSL certificate verification:
|
2 |
| --psettings | Custom filename for portable settings. Ignored if file does not exist. | portable_settings.txt (if that file exists) |
Examples:
- Start over using stored settings from session "xyz":
- c:\path\to\heidisql.exe -d=xyz
- c:\path\to\heidisql.exe -description=xyz
- Connect with different username or port:
- c:\path\to\heidisql.exe -d=xyz -u=OtherUser
- c:\path\to\heidisql.exe -d=xyz -P=3307
- Connect to a non-stored session:
- c:\path\to\heidisql.exe -h="127.0.0.1" -u=root -p=Mypass -P=3307
- Open multiple .sql files in query tabs:
- c:\path\to\heidisql.exe fileA.sql path\to\fileB.sql fileC.sql ...
- Use custom portable settings file:
- c:\path\to\heidisql.exe --psettings=c:\temp\p.txt
The database tree
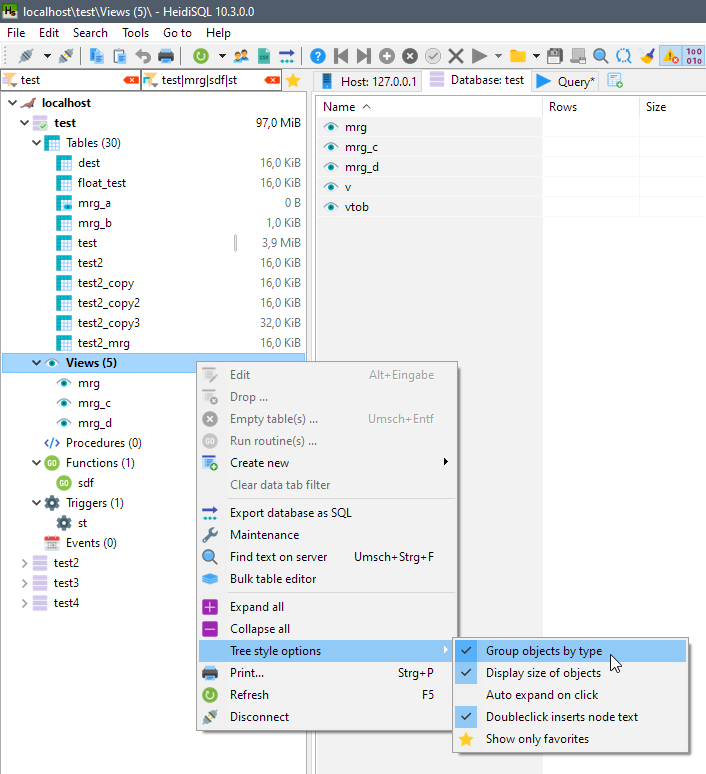
When you have a large amount of tables, views or whatever in your database(s), you probably want to group these by their type, for a better overview. Just right click the tree and activate Tree style options > Group objects by type:
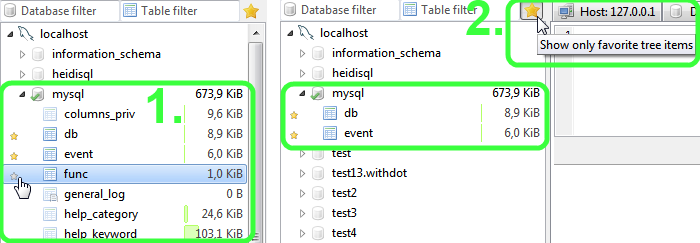
You can also mark important items as so called favorites, by mouse click on the very left area of a table. Afterwards, you can limit the tree to show only favorites by a click on the new "Show only favorites" button at the top:
Creating a table
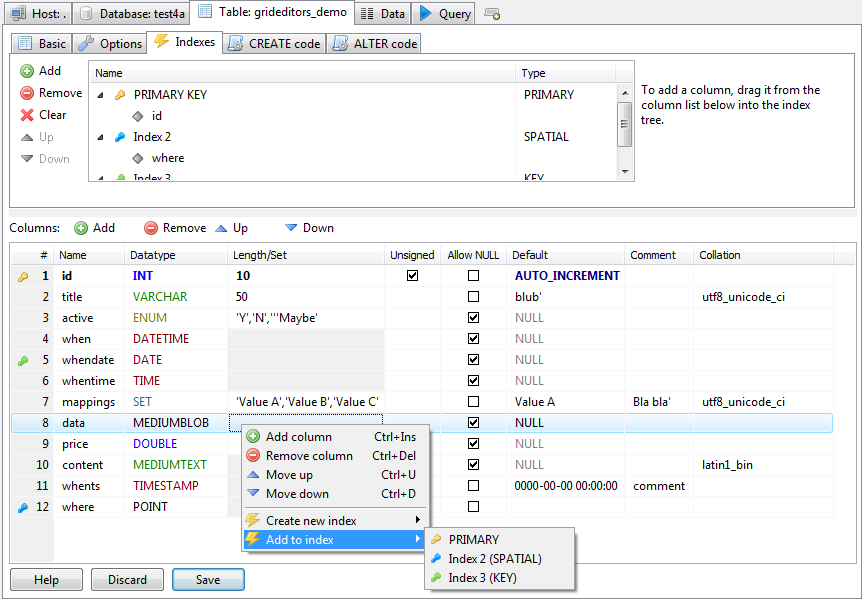
HeidiSQL comes with a feature-rich GUI for creating and editing a table structure. Just right click the datatabase in which you want to create a table, then point on "Create new", then click "Table":

Done that, you'll see the table editor like in the following picture:
Creating a view
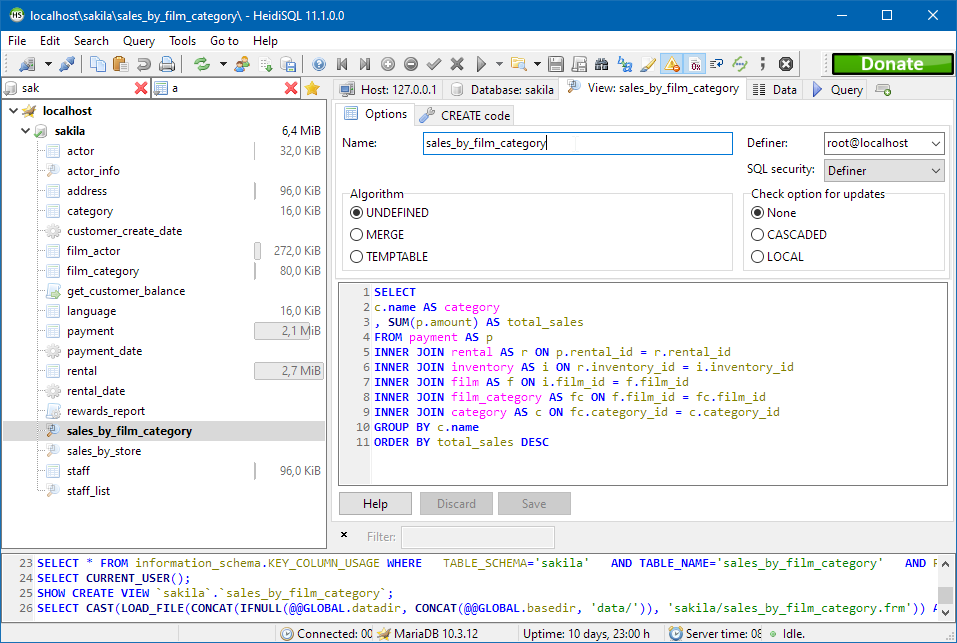
Click "Create new", then click "View", to show up the view editor. Creating a view is basically like writing a SELECT query. Give it a name, and click the save button to create it. HeidiSQL shows the data of the view in the "Data" tab, like for tables.
One thing you might notice is that MySQL and MariaDB are reformatting the SELECT query in the view when you save it. This destroys indentation, and converts the whole query into a one-liner. HeidiSQL tries its best to restore the original code of the view, by loading it from the *.frm file on the server. However, this fails in many cases, often due to restricted file privileges. For such cases, the only way to make it readable again is to use HeidiSQL's reformatter (Ctrl+F8).
Creating a stored procedure
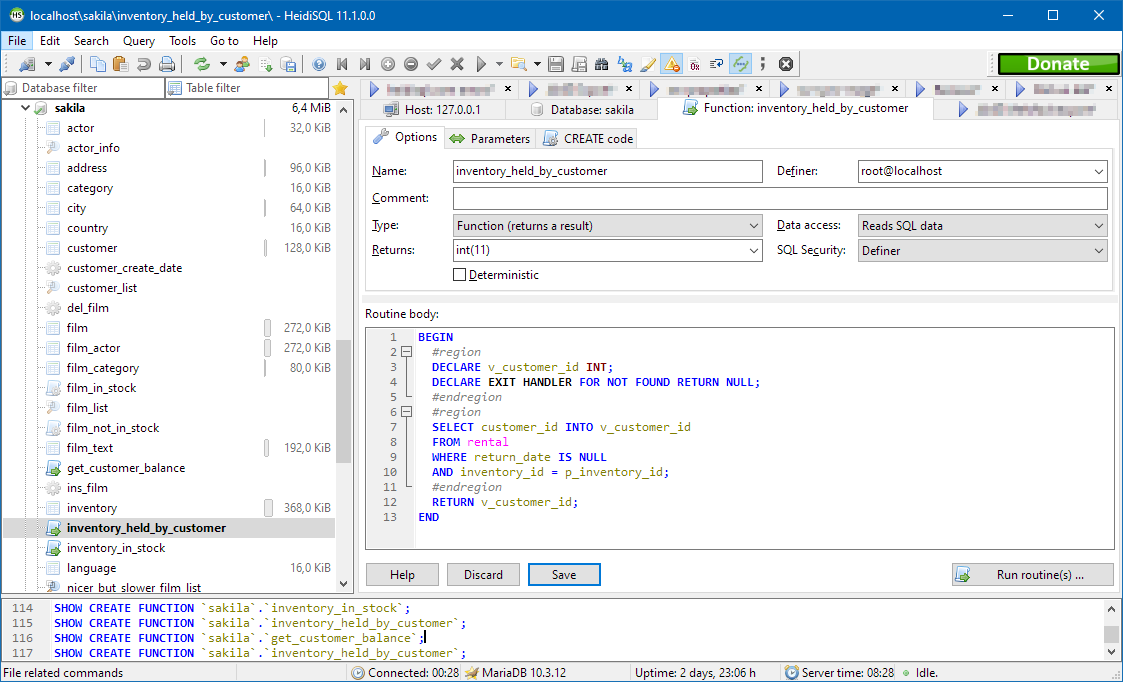
Just right click the datatabase in which you want to create a procedure, then point on "Create new", then click "Procedure" or "Function". Done that, you'll see the procedure editor like in the following picture:
Creating a trigger
Creating a scheduled event
The Data tab
On the data tab, the contents of the currently selected table or view are displayed. This is one of the most useful and powerful features of HeidiSQL. You will see different colors for the various groups of data types. These colors are customizable in Tools > Preferences > Data appearance.
Pressing F2 or one-long-click in a grid cell will start the editor mode. This will allow you inserting ordinary values into a row. For inserting special values, such as SQL functions, NULL or GUIDs, right click a cell, and point to the Insert value > submenu.
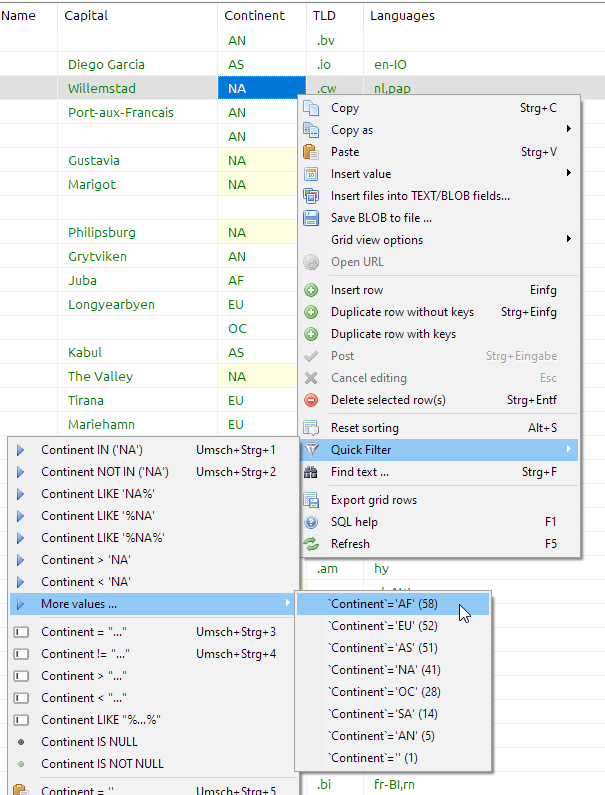
Quick filters: Right click a value in the grid, then click Quick filter to get various one-click options to create a WHERE clause on the grid values. This filter can be base on either the focused cell in the grid, a prompted value, or on the contents of your clipboard.
In the Quick filter sub menu, you will find a More values sub-sub-menu. Pointing to that menu, HeidiSQL quickly collects and displays the top 30 items in the focused column, grouped by their value:
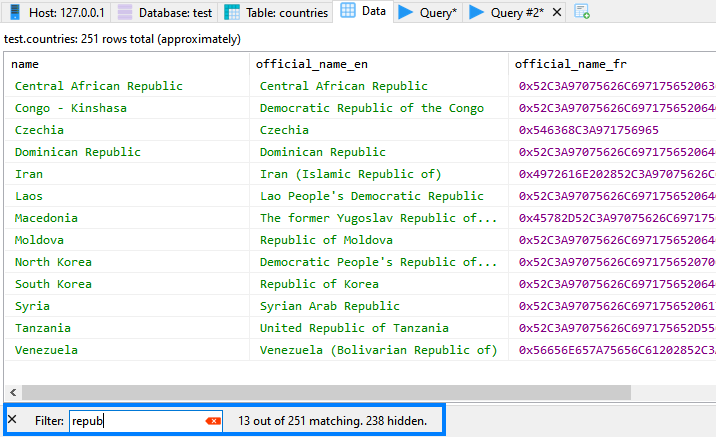
Finding specific values in such a grid can be a pain. For a simple client side filter, you can enter some value in the filter panel. Activate it in Edit > Filter panel (Ctrl+Alt+F):
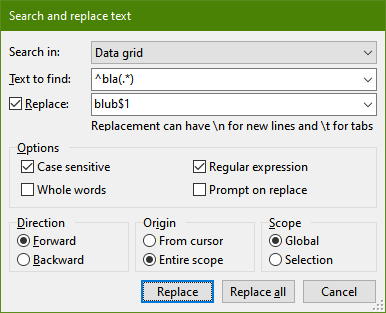
HeidiSQL can also assists you with a Search and replace dialog (Find mode: Ctrl+F, Replace mode: Ctrl+R). That dialog can be used on SQL query tabs too.
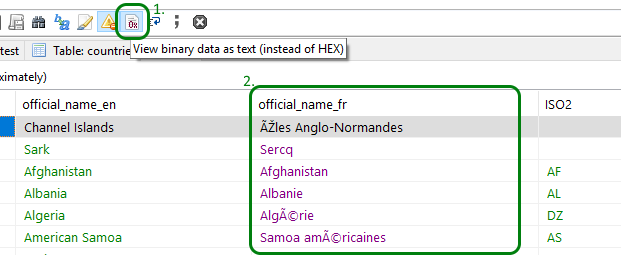
Binary values, also called BLOBs, are by default displayed in hexadecimal format, which is mostly unreadable for a human being. For cases in which such BLOBs contain readable text, HeidiSQL offers to toggle between hex-mode and text-mode. Press or "unpress" the white button with the purple "0x" on it:
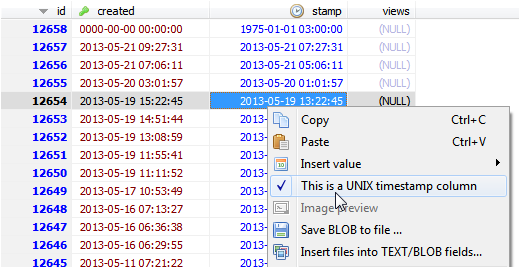
Probably you have a table with one or more integer columns which represent UNIX timestamps. HeidiSQL can display such integer columns as date/time values, so you can better read them:
Running SQL queries
HeidiSQL has a "Query" tab by default. You can create more than this default one by pressing Ctrl+T, or by right clicking the main tabs, then click "New query tab". In such a query tab, you can write your own database queries, or load a .sql file from your harddisk. Pressing F9, or the button with the blue "play" icon on it executes your query or queries.
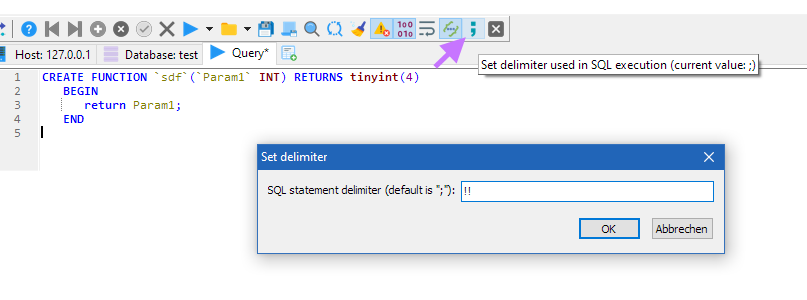
Compound queries e.g. for creating a function often have a semicolon inside the query. As HeidiSQL separates queries at each semicolon, you will get syntax errors when you run such commands. You can set a different query delimiter for such purposes, e.g. "!!", as shown in the screenshot:
Alternatively, you can change the delimiter via code:
DELIMITER !!
-- your code
DELIMITER ;
On the right hand of each query tab, you have the "query helpers" panel, with table columns, reserved words,
SQL functions etc.
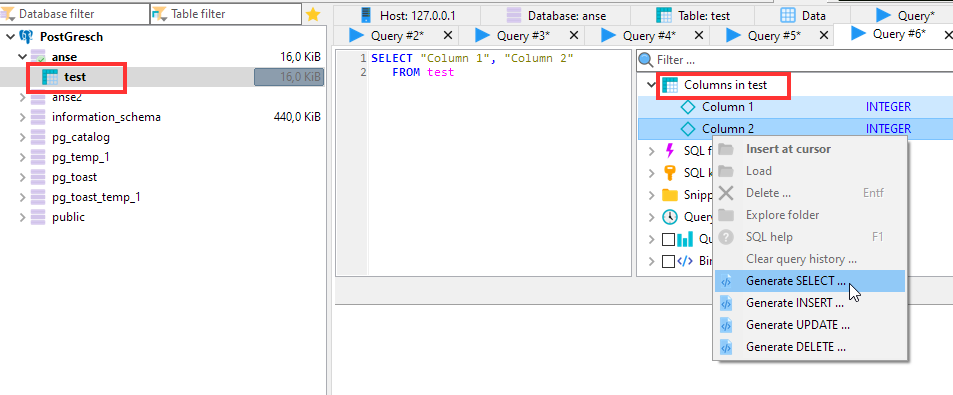
Having a table selected in the left tree, the first tree item in the helpers show "Columns in <selected-table>".
The contained "Generate..." menu items use the selected column names to create a quick query for you in the editor:
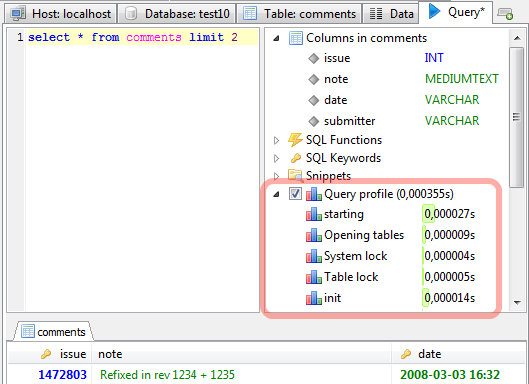
To see how your query performs in MariaDB or MySQL, you can activate the "Query profile" option in the helpers box on the right. Then, run your query or queries, and see what the profile timings show. This is basically what SHOW PROFILE in MySQL 5.0.37 and later releases does.
HeidiSQL supports parameterized SQL queries: Activate it per click on the checkbox "Bind
parameter", and
start writing a query with parameters, e.g.
select ':p'.
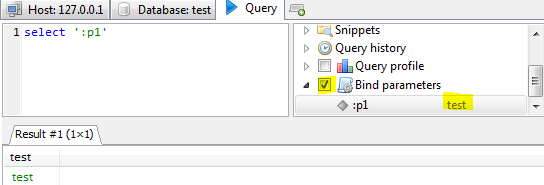
The first part of the bind parameter implementation was done by Adrian Granger.
HeidiSQL can execute a batch of queries (= multiple queries, separated by semicolon) in one go. That way, execution gets dramatically faster, especially when having tons of mini queries. To activate that "one go execution", just click the drop down menu of the blue "play" button, then click "Send batch in one go":

MS SQL users should turn this on when having trouble with declaring a variable, e.g.:
Declare @RowNo int =1;
SELECT @RowNo;
SQL export
HeidiSQL can generate nice SQL export files for you. This is basically what mysqldump also does. However, you can also tell HeidiSQL to put the results of the export into
- an .sql file
- a ZIP compressed .sql file
- into your clipboard
- another database on the same server
- a new or existing database on a server on which you have a configured HeidiSQL session
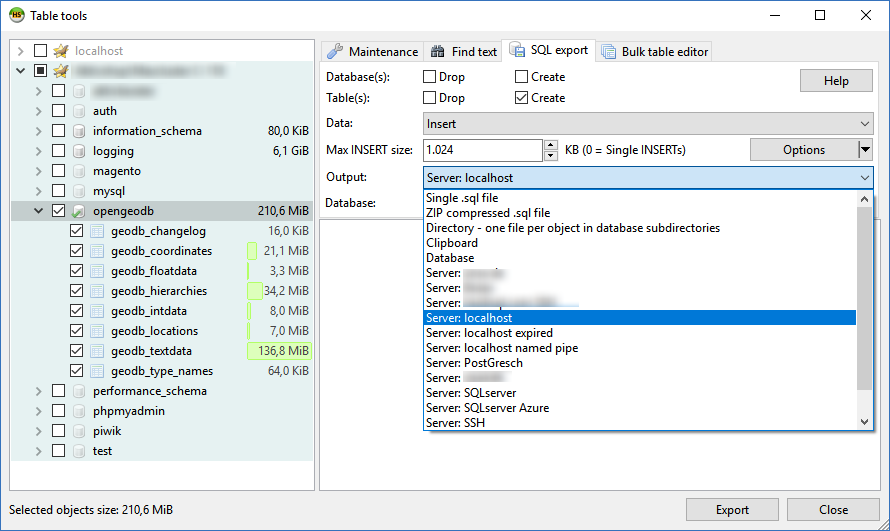
- Database(s)
-
Controls whether to a) drop an existing database on the target server first, and b) create it.
This is meant for the target server, not the source server! - Table(s)
- Same as above, just for tables, views, procedures etc. When checked, the table(s) will be dropped first, and/or created afterwards.
- Data
- How the rows are created on the target server. Select "No data" to make a structure-only export. Default is "INSERT".
- Max INSERT size
- Defines the maximum size of the extended INSERT statements, which can hold multiple rows in one statement. Note that a MariaDB/MySQL server limits the size of a query sent to the server by the server variable max_allowed_packet. Be sure to use a lower value in this dialog, otherwise MariaDB/MySQL will kill your connection when importing that file.
- Output
- Either select a filename (zip compressed or uncompressed), a directory in which HeidiSQL will place .sql files, clipboard, another database or a configured HeidiSQL (and a database name below).
- Filename, Directory, or Database
- Depends on what you selected in the "output" pulldown menu.
Importing files
HeidiSQL can import .sql files with data rows and/or structure, .csv files with data rows and binary files for BLOBs.
Importing .sql files
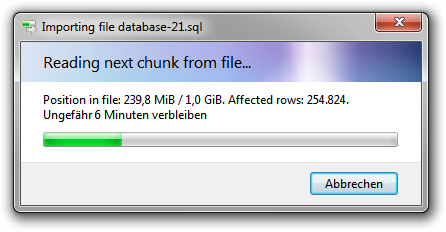
At first, activate the database you want the import to run in. Then, go to File > "Run SQL file", and select the file to import. Below the filename input box, you will find an Encoding dropdown menu. Using "Auto detect" is a common way to get broken data afterwards - so if are sure about the encoding in that file, you should definitely select the right one, e.g. "UTF-8". After clicking "OK", HeidiSQL will start to execute the contained commands immediately, and you can watch the progress:
Importing .csv files (text files)
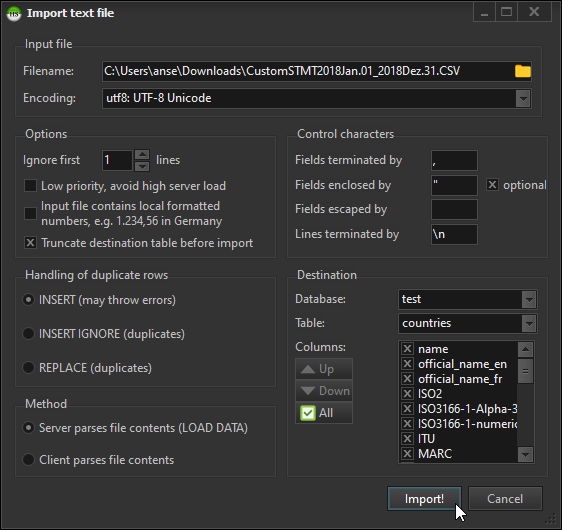
A .csv file is a text file with data rows for one table. You can import such a file into a table via Tools > "Import CSV file". You will have to tell HeidiSQL the format of the file (line terminator, enclosing character etc.).
Importing binary or text files into BLOBs
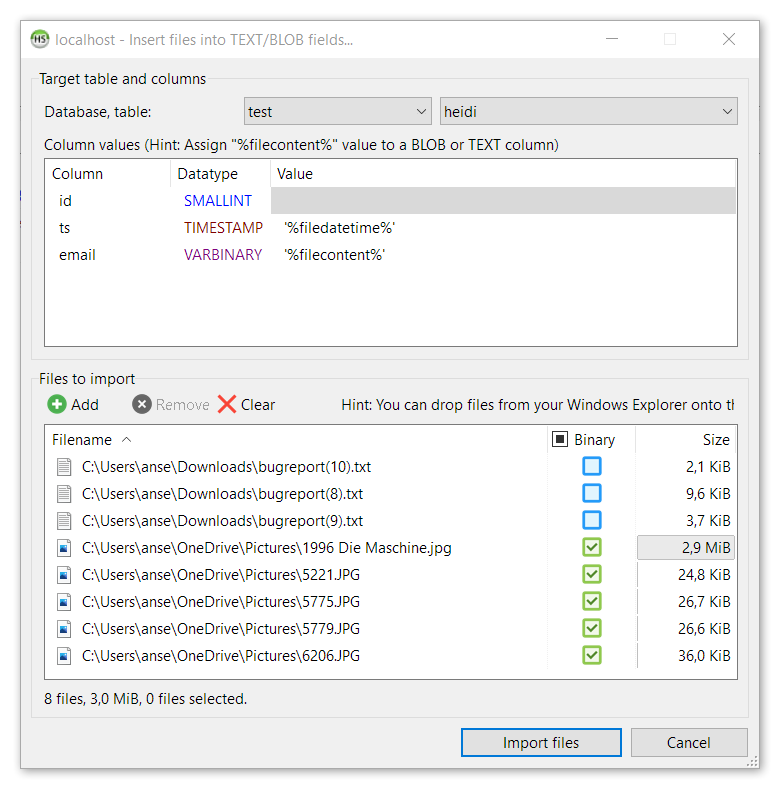
Via Tools > "Insert files into TEXT/BLOB fields", you can insert new rows from all kind of files into your tables.
First, select the database and the table you want to put the files into. Then, click on the green "Add" button, to add one
or more files to the listing. In the upper listing you will have to tell HeidiSQL with placeholders in which column the
file content goes. In the "Value" column, click besides the right field name and select '%filecontent%'. Some other
placeholders are available in that dropdown. You can also wrap the placeholders (or even static text) with some SQL function.
For example if you want the file name in lowercase, you apply LOWER('%filename%').
HeidiSQL portable
If HeidiSQL finds a portable.lock file, or a portable_settings.txt,
or the custom filename as noted above, it starts in portable mode. Which means basically that all settings are restored
from that file and when exiting stored again into that file.
When you download the portable package, that portable_settings.txt needs to be manually
copied from your old portable HeidiSQL directory. Not doing so will show you an empty session manager.
License
HeidiSQL is OpenSource and released under GPL (GNU GENERAL PUBLIC LICENSE). See the license.txt for more details.
Probably HeidiSQL saved you a lot of time and you like it. In this case you may make a donation here.
Credits
Author: Ansgar Becker (Germany)
Third party components and graphics, in a random order:
- Ulrich Telle (SQLite encryption, MIT license)
- Joachim Marder (VirtualTreeView, GLPL)
- Christian Budde (SynEdit, MPL)
- Serhiy Perevoznyk (JumpList)
- Iztok Kacin (Cromis.DirectoryWatch, BSD License)
- Thomas Müller (GNU Gettext for Delphi, BSD License)
- Rodrigo Ruz (VCL Styles Utils)
- Dennis D. Spreen (VerySimpleXML)
- Charlie Etienne (Material Theme)
- Mahdi Safsafi (Delphi Detours Library)
- Volker Siebert (SizeGrip, M.I.T. License)
- Jeremy Dorn (sql-formatter, MIT License)
- Jordan Russell (Inno Setup)
- Mathias Rauen (madExcept)
- Icons8 (New high resolution icons, icons8.com)
- Mark James (Silk icons, Creative Commons 2.5)
- Sven Lorenz (graphics)
Former development contributors:
- David Dindorp (Denmark): threading, complex stuff, thinking
- Adrien Granger (France): query parameters
- Francisco Ernesto Teixeira (Brazil): motivation, ideas
Thanks to Transifex.com for a free translation account, and all the registered translators.
1000 thanks for great (database) software:
- Michael 'Monty' Widenus and his fellows for founding MySQL in 1995 and MariaDB in 2009
- Microsoft for their feature-rich SQL Server, ported from Sybase in 1989
- Michael Stonebraker and Larry Rowe for evolving PostgreSQL from Ingres in 1996
- Dwayne Richard Hipp for authoring SQLite in 2000
- Embarcadero for Delphi and Interbase.
